
I know there are several ajax, flash etc up-load interfaces free out on the internet. But where is the fun in using someone else's hard work? There is no sense of achievement and can sometimes be a pain in the ass to customize to fit your site.
So using some CSS trickery and jquery, I will try to show you how you can build your own custom file selection interface, which you can customize to fit YOUR site.
So lets rock and roll.
Firstly, lets see what a standard file selectors look like...
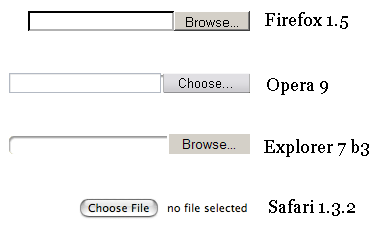
(image taken from http://www.quirksmode.org)
EWWW cover your eyes kids!! that is NOT pretty!!
ok image is outdated, but the point still remains. It is not pretty, and really does not fit into ANY website.
so, how do we improve this?
We will be using 4 elements. the first is a containment div, which will hold 2 more elements. These will be a file selection input type, and another div which we will style to be our button. The 4th will be a div that we will populate with the text that you will usually see in the file input field.
So the first step will be putting down the code to layout the elements on the page.
Code: Select all
<div id="upload_container">
    <input type="file" name="name" />
    <div class="upload_button">Select File</div>
</div>

<div id="upload_text"></div>
So to the CSS.
Our first element, the container, is a simple 3 lines. This will be the size of the button and we want to give it a containing position.
Code: Select all
#upload_container
{
    width: 90px;
    height: 25px;
    position: relative;
}
Now, we want to work on the button itself. Getting it to fit is a short amount of styling.
Code: Select all
#upload_container .upload_button
{
    height: 25px;
    width: 90px;
    position: absolute;
    z-index: 1;
}
So currently, we have the container and the button set out. Now this is where the CSS trickery comes in. When we style our input box, we want to make the input box invisible, but still work. Now we cant do this with the visibility property and setting it to hidden. That just dont work and nor will setting the display property to none.
So how do we do this? we use the opacity property.
Code: Select all
#upload_container input[type="file"]
{
    width:90px;
    position: absolute;
    z-index: 2;
    opacity: 0;
    cursor: pointer;
}
as far as CSS goes. Thats it. you can style your button how you want, and give the upload_text div a bit of styling as well if you so wish. But neither change the function of the setup.
Right. Now onto the very small piece of jQuery that will display the name of the file we want to upload.
What we need to do, is grab the content of the input box and place it into the div. And this is how we do it.
Code: Select all
$(function()
{
    $('input[type=file]').change(function(e)
    {
        var leafname= $(this).val().split('\\').pop().split('/').pop();
        $('#upload_text').text(leafname);
    });
});
Thats all you need. you will go from the above... to this.

Have fun

